编辑/etc/security/limits.conf文件,添加或修改相应的行来增加限制。例如:
1 | * soft nproc 65535 |
编辑/etc/security/limits.conf文件,添加或修改相应的行来增加限制。例如:
1 | * soft nproc 65535 |
1 | use admin |
双击下载下来的MatrikonOPCSimulation.EXE安装文件

接受并Next

选择Complete Setup并Next

安装路径为c:\Program Files\Matrikon\OPC然后Next
![]()
默认,Next

默认密码是MatrikonOPC然后选择Next

然后选择Next进行安装
最后安装完成会出现如下图示

选择第一个和第二个Checked,其他选项Uncheck 第一个的意思是打开MatrikonOPC Configuration Panel 第二个的意思是打开Quick
Start文档(有兴趣可以看一下,英文的)
本次安装包含三部分
1 | # 运行 OpenClaw 的内置卸载程序 |
Node.js ≥ 22.0.0
npm ≥ 10.0.0(或 pnpm ≥ 8.0.0)
1 |
1 | # 如果还没有安装 pnpm |
1 | npm install -g openclaw@latest |
1 | openclaw onboard --install-daemon |
在终端执行以下命令:
1 | openclaw onboard --install-daemon |
1 | # 打开 Web Dashboard |
1 | # 与助手对话 |
1 | # 列出所有渠道 |
1 | # 列出已安装的技能 |
1 | # 列出所有插件 |
1 | # 更新到最新稳定版 |
1 | https://dashscope.aliyuncs.com/compatible-mode/v1 |
1 | https://api.deepseek.com |
记录下,Virtualbox下如何实现主机和虚拟机之间文件夹共享及双向拷贝
关于双向拷贝
1.设置虚拟机为“双向”共享粘贴

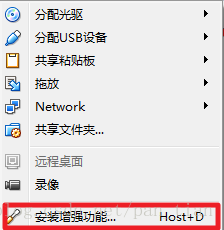
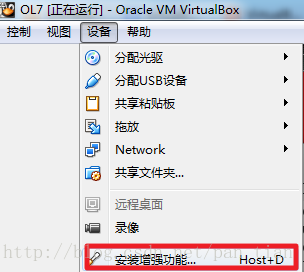
有的人反应只要设置双向粘贴就可以,但是我的不行,我还需要再给虚拟机安装一下增强功能。需要启动虚拟机,安装菜单项“设备”中的最后一项。
安装完增强功能,注意要重启虚拟机,双向拷贝才被启用。
关于文件夹共享
情况一:
Host操作系统:Windows 7
Guest操作系统:Windows Server
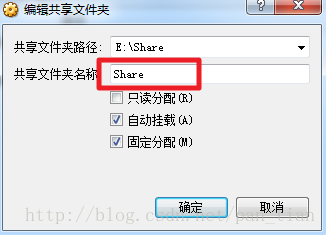
1.首先设置共享文件夹
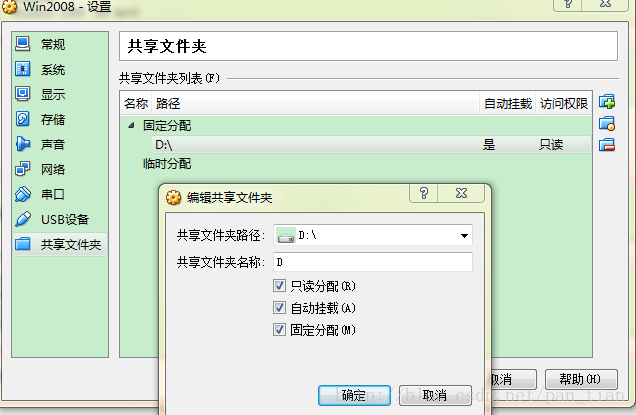
2.虚拟机中的菜单项中,设备 - 分配光驱 – 选择一个虚拟光盘。在弹出的对话框选择 VirtualBox 安装目录下选择
VBoxGuestAdditions.iso
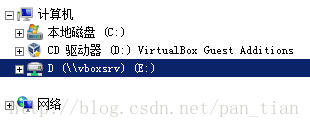
3.虚拟机中的光驱,运行VBoxWindowsAdditions.exe,安装完成后,重启虚拟机中的系统,就能看到主机中的共享目录了。
情况二:
Host操作系统:Windows 7
Guest操作系统:Oracle Linux
和情况一一样先设置共享目录。
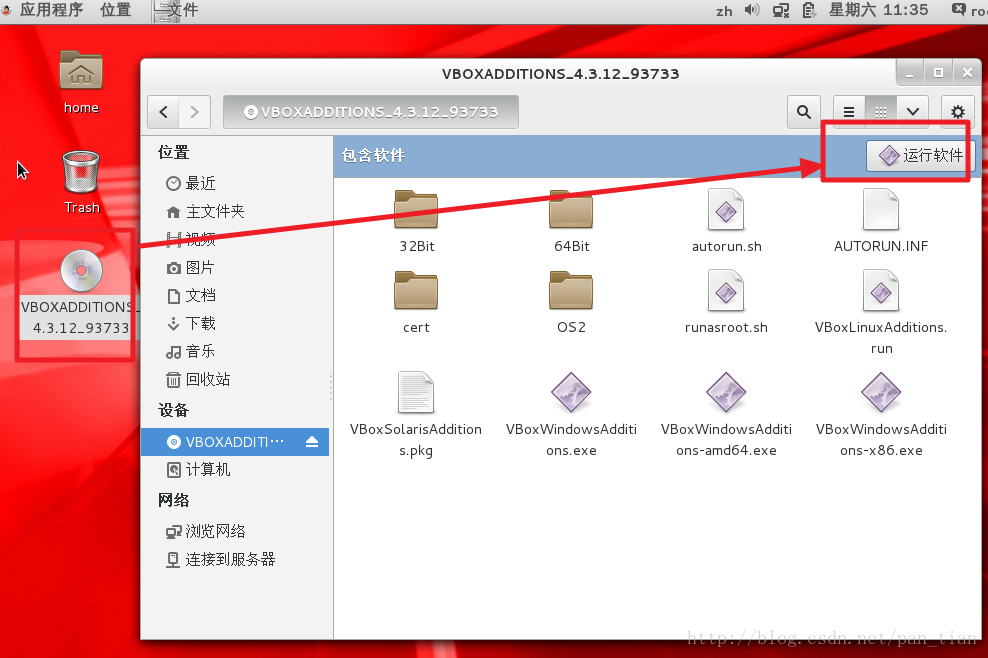
然后在Linux虚拟机上边的菜单中,设备->安装增强功能。
出现VBOXADDITIONS,然后运行此软件
可以看到共享文件夹了
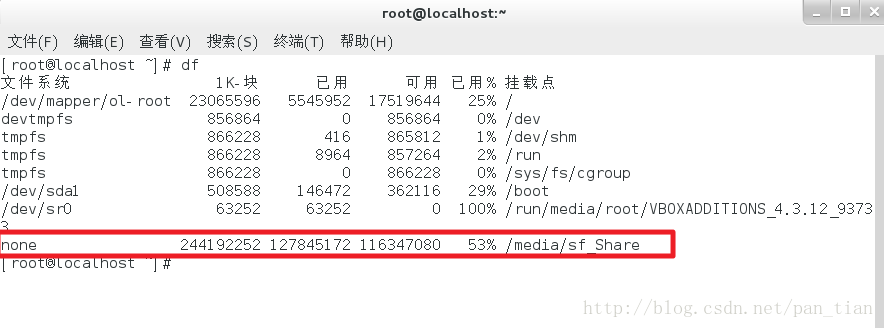
挂在这个目录到Linux本地目录。
首先创建一个文件夹
mkdir /home/share
改为可读可写
cd /home/share
chmod 777 .
运行命令加载
sudo mount -t vboxsf -o uid=1000,gid=1000 Share /home/share
红色Share为VirtualBox共享目录的名字
蓝色的/home/share为刚刚创建的目标目录。

-t:TCP 端口-u:UDP 端口-l:仅显示监听套接字-n:不解析服务名(直接显示端口号)-p:显示进程 PID 和名称有了 PID,就可以查看该进程的详细信息:
1 | ls -l /proc/<PID>/exe |
示例:ls -l /proc/12345/exe 会显示指向实际可执行文件的符号链接。
1 | pwdx <PID> |
或者:
1 | readlink /proc/<PID>/cwd |
1 | ls -l /proc/<PID>/fd/ |
这列出了该进程打开的所有文件描述符,通过符号链接可以看到实际的文件路径。
1 | ps -ef | grep <PID> |
cmdline 文件以 \0 分隔参数,用 tr 转换为空格以便阅读。
1 | systemctl status <服务名> # 先找到服务名 |