Docker启用TLS加密解决暴露2375端口引发的安全漏洞,被黑掉三台云主机的教训总结 1. 设置主机名 编辑/etc/hostname,服务器主机名 ubuntu
2. 生成TLS证书 创建证书生成脚本 docker-cert.sh,放置/script目录
1 2 3 sudo mkdir -p /script /data/cert/dockersudo touch /script/docker-cert.shsudo vim /script/docker-cert.sh
docker-cert.sh添加内容
1 2 3 4 5 6 7 8 9 10 11 12 13 14 15 16 17 18 19 20 21 22 23 24 25 26 27 28 #!/bin/bash set -eif [ -z $1 ];then echo "请输入Docker服务器主机名" exit 0 fi HOST=$1 mkdir -p /data/cert/dockercd /data/cert/dockeropenssl genrsa -aes256 -out ca-key.pem 4096 openssl req -new -x509 -days 3650 -key ca-key.pem -sha256 -out ca.pem openssl genrsa -out ca-key.pem 4096 openssl req -subj "/CN=$HOST " -sha256 -new -key ca-key.pem -out server.csr echo subjectAltName = IP:$HOST ,IP:0.0.0.0 > extfile.cnfopenssl x509 -req -days 3650 -sha256 -in server.csr -CA ca.pem -CAkey ca-key.pem -CAcreateserial -out server-key.pem -extfile extfile.cnf openssl genrsa -out key.pem 4096 openssl req -subj '/CN=client' -new -key key.pem -out client.csr echo extendedKeyUsage = clientAuth > extfile.cnfopenssl x509 -req -days 3650 -sha256 -in client.csr -CA ca.pem -CAkey ca-key.pem -CAcreateserial -out cert.pem -extfile extfile.cnf rm -v client.csr server.csrchmod -v 0400 ca-key.pem key.pem ca-key.pemchmod -v 0444 ca.pem server-key.pem cert.pem
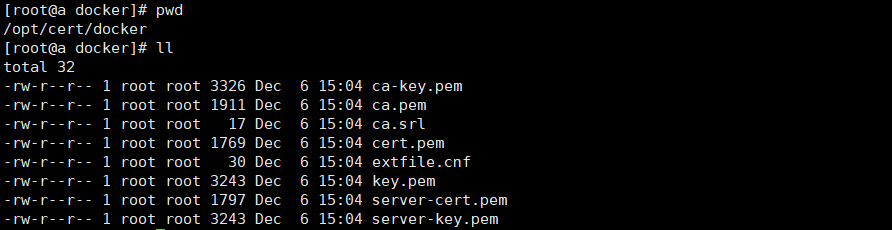
执行 docker-cert.sh 脚本,生成证书放置 /data/cert/docker 目录中
1 2 3 4 5 sh /script/docker-cert.sh ubuntu sh /script/docker-cert.sh VM-12-雷赛.电机.PR模式.配置-centos (密码: ubuntu666) sh /script/docker-cert.sh ubuntu (密码: ubuntu666) sh /script/docker-cert.sh VM-12-4-ubuntu (密码: ubuntu666)
按照提示输入相关信息,密码一致就行,其他信息可留空,等脚本指定完成之后,可在 /data/cert/docker 目录查看到生成的证书。
Docker 只接受「未加密的私钥」 你给的 .key 文件是 RSA 加密私钥(文件头里能看到 —–BEGIN RSA PRIVATE KEY—– 或 Proc-Type: 4,ENCRYPTED),启动时 dockerd
如果私钥仍带密码,先按前面说的去密码:
1 2 3 sudo openssl rsa -in server-key.pem -out server-key-clear.pem sudo mv server-key-clear.pem server-key.pem sudo chmod 600 server-key.pem
证书生成过程问题解决 OpenSSL 报错写得很清楚:
1 bad ip address … value=ubuntu
你在 extfile.cnf 里把 主机名 (ubuntu)直接写进了 IP: 字段,而 IP: 后面必须是纯 IPv4/IPv6 地址 ,不能是字符串域名或主机名。DNS:ubuntu 或者干脆去掉域名,只保留合法 IP 即可。
修正扩展文件
1 2 3 cat > extfile.cnf <<EOF subjectAltName = DNS:ubuntu,IP:127.0.0.1,IP:10.0.0.0/8 EOF
如果你只想让任何地址都能连,也可以最简写:
1 echo "subjectAltName = IP:0.0.0.0" > extfile.cnf
重新签发
1 2 3 4 openssl x509 -req -in server.csr \ -CA ca.pem -CAkey ca-key.pem -CAcreateserial \ -out server-cert.pem -days 3650 -sha256 \ -extfile extfile.cnf
验证
1 openssl x509 -in server-cert.pem -text -noout | grep -A1 "Subject Alternative Name"
应看到:
1 2 X509v3 Subject Alternative Name: DNS:ubuntu, IP:127.0.0.1, IP:0.0.0.0/8
不再报错即可。
查看生成后的证书
3. 配置Docker启用TLS 1 2 sudo cat /usr/lib/systemd/system/docker.servicesudo vim /usr/lib/systemd/system/docker.service
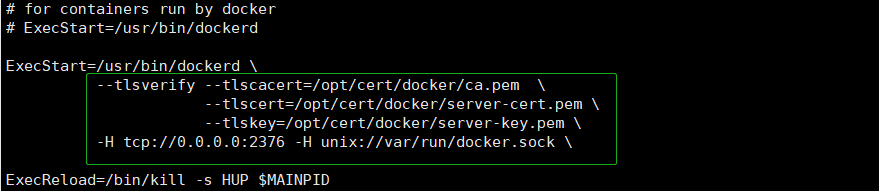
在ExecStart属性后追加
1 2 3 4 --tlsverify --tlscacert=/data/cert/docker/ca.pem \ --tlscert=/data/cert/docker/server-cert.pem \ --tlskey=/data/cert/docker/server-key.pem \ -H tcp://0.0.0.0:2376 -H unix://var/run/docker.sock
1 --tlsverify --tlscacert=/data/cert/docker/ca.pem --tlscert=/data/cert/docker/server-cert.pem --tlskey=/data/cert/docker/server-key.pem -H tcp://0.0.0.0:2376 -H unix://var/run/docker.sock
重新加载docker配置后重启
1 2 3 4 5 6 7 8 9 10 11 12 sudo systemctl daemon-reload sudo systemctl restart docker sudo journalctl -u docker.service -n 50 # 检查是否加密 如果提示 Enter pass phrase,就说明被加密了。 sudo openssl rsa -in /data/cert/docker/ca-key.pem -check -noout 调试验证 >> /usr/bin/dockerd -H fd:// --containerd=/run/containerd/containerd.sock --tlsverify --tlscacert=/data/cert/docker/ca.pem --tlscert=/data/cert/docker/server-cert.pem --tlskey=/data/cert/docker/server-key.pem -H tcp://0.0.0.0:2376 -H unix://var/run/docker.sock sudo systemctl daemon-reload && sudo systemctl restart docker
查看2376端口是否启动
1 netstat -nltp | grep 2376
本地连接测试Docker API是否可用
1 2 curl https://ubuntu:2376/info curl https://127.0.0.1:2376/info
1 2 3 4 5 6 7 curl https://ubuntu:2376/info --cert /data/cert/docker/cert.pem --key /data/cert/docker/key.pem --cacert /data/cert/docker/ca.pem curl https://127.0.0.1:2376/info --cert /data/cert/docker/cert.pem --key /data/cert/docker/key.pem --cacert /data/cert/docker/ca.pem curl https://ubuntu:2376/info --cert /data/cert/docker/cert.pem --key /data/cert/docker/key.pem --cacert /data/cert/docker/ca.pem https://ubuntu:2376
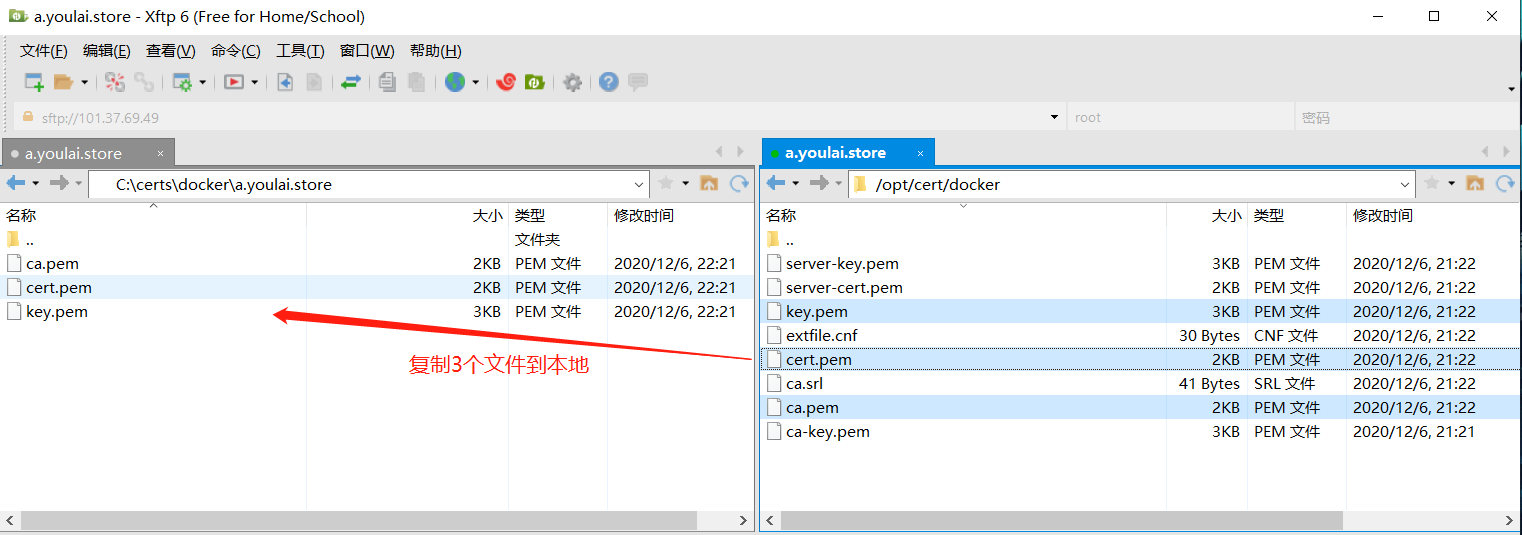
4. IDEA配置 将客户端所需的ca.pem、cert.pem、key.pem3个密钥文件从服务器下载到本地
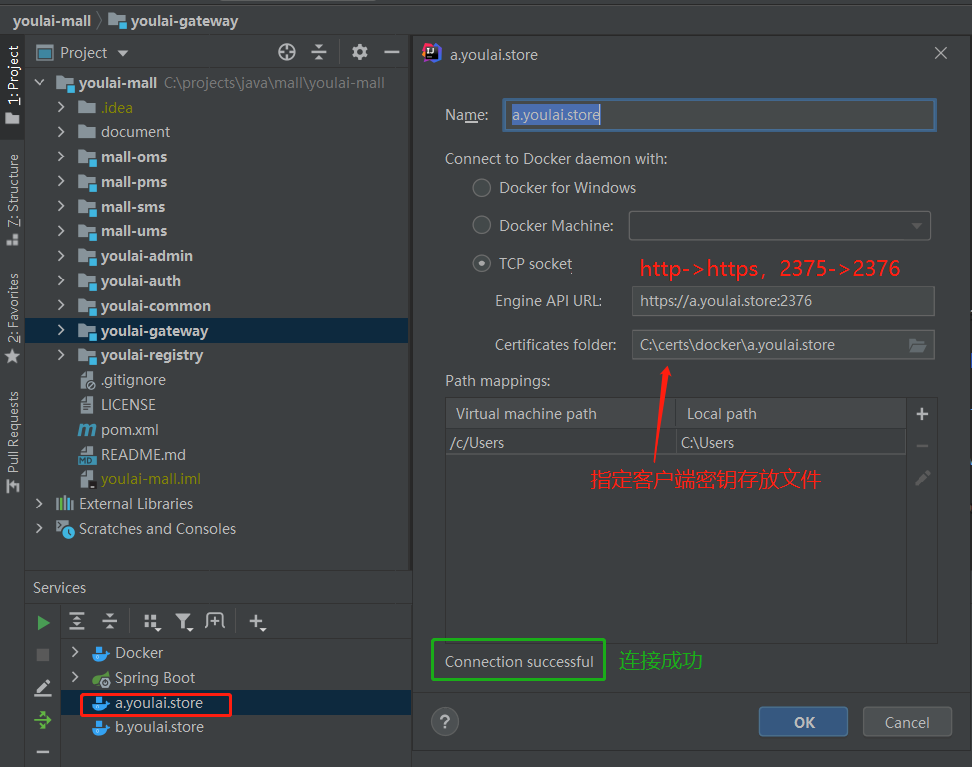
IDEA连接Docker配置修改
pom.xml
1 2 3 4 5 6 7 8 9 10 11 12 13 14 15 16 17 18 19 20 21 22 23 24 25 26 27 28 29 30 31 32 33 34 35 36 37 38 39 40 41 42 43 44 45 46 47 48 49 50 51 52 53 54 55 56 <build > <plugins > <plugin > <groupId > org.springframework.boot</groupId > <artifactId > spring-boot-maven-plugin</artifactId > </plugin > <plugin > <groupId > com.spotify</groupId > <artifactId > docker-maven-plugin</artifactId > <version > 1.0.0</version > <executions > <execution > <id > build-image</id > <phase > package</phase > <goals > <goal > build</goal > </goals > </execution > </executions > <configuration > <imageName > ${project.artifactId}</imageName > <imageTags > <imageTag > latest</imageTag > </imageTags > <baseImage > openjdk:8-jdk-alpine</baseImage > <workdir > /</workdir > <entryPoint > ["java","-jar","${project.build.finalName}.jar"]</entryPoint > <dockerHost > https://ubuntu:2376</dockerHost > <dockerCertPath > C:\certs\docker\ubuntu</dockerCertPath > <resources > <resource > <targetPath > /</targetPath > <directory > ${project.build.directory}</directory > <include > ${project.build.finalName}.jar</include > </resource > </resources > </configuration > </plugin > </plugins > </build >