win11专业版激活密钥

https://zhuanlan.zhihu.com/p/637930518

1
2
3
4
5
6
7
8
9
BCQNW-3VWYB-4V7QD-M6R2B-7MH26

第一个可以

3JMNH-HBQ2K-C7VYP-4KGFR-DJ3GY

J8WVF-9X3GM-4WVYC-VDHQG-42CXT

7Y64F-88DCY-Y6WTC-H33D2-64QHF
1
还是无法激活成功的看过来:打开终端管理员,输入irm massgrave.dev/get | iex,出现的窗口选7 Extras,弹出的窗口中选1 change windows edition,再弹出窗口选1 Professional,这时候会重启电脑。重启后,设置中显示没有激活,输入key,还是失败,不管它。再次打开终端管理员,输入irm massgrave.dev/get | iex,然后选择1 permanent,就激活成功啦。
1
2
3
4
5
6
7
8
9
密匙:J8WVF-9X3GM-4WVYC-VDHQG-42CXT
(1)到系统输入密匙

(2)win+R, 输入powershell, 回车, 再在弹出的窗口内输:
irm massgrave.dev/get.ps1 | iex
(3)弹出窗口选[1]
(4)回到系统查看会显示”激活成功“

先脱机在输入密钥,更新完成后联网,在按照步骤1-4操作。

Git Tag打标签功能

标签tag(Git Tag)

当开发到一定阶段时,给程序打标签是非常棒的功能。

1
2
3
4
5
6
7
8
9
10
11
12
13
git tag -a v0.1 -m 'my version 1.4' # 新建带注释标签   
git push origin --tags # 一次性推送所有分支
git push origin v1.5 # 推送单个tag到orgin源上
git tag -v v1.4.2.1 # 验证标签,验证已经签署的标签
git show v1.5 # 看到对应的 GPG 签

git tag # 列出现有标签
git tag v0gi.1 # 新建标签
git checkout tagname # 切换到标签
git tag -d v0.1 # 删除标签
git push origin :refs/tags/v0.1 # 删除远程标签
git pull --all # 获取远程所有内容包括tag
git --git-dir='<绝对地址>/.git' describe --tags HEAD # 查看本地版本信息

KEPServerEX IotGateWay配置Modbus采集并发送MQTTClient消息

Iot GateWay Agent配置注意事项

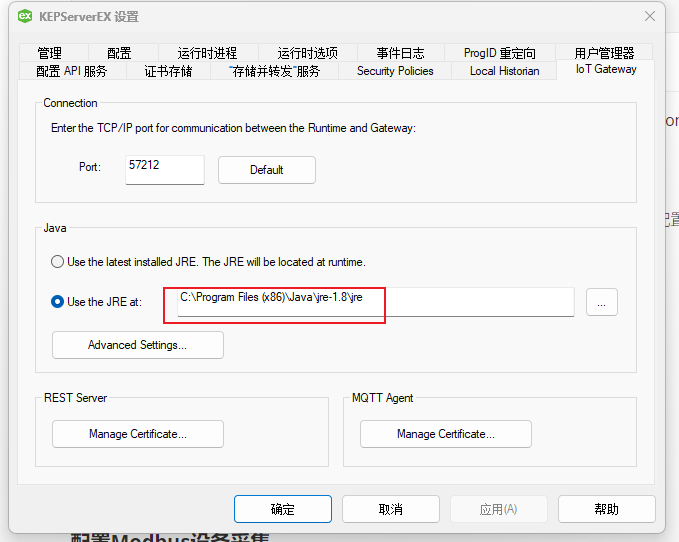
Iot GateWay Agent依赖JRE1.8环境,需要配置JRE环境后,IOT GateWay配置的Agent才会生效和有效!

日志信息 KEPServerEX\IoT Gateway IoT Gateway using JRE at [C:\Program Files (x86)\Java\jre-1.8].

Iot GateWay依赖JRE加载日志(需jie加载成功)

1
2
3
4
5
6
7
8
9
日期       时间       级别     源                        事件
2025/5/26 18:18:24 信息 KEPServerEX\Runtime IoT Gateway V6.5.829.0
2025/5/26 18:18:25 信息 KEPServerEX\IoT Gateway IoT Gateway service starting.
2025/5/26 18:18:25 信息 KEPServerEX\IoT Gateway IoT Gateway using JRE at [C:\Program Files (x86)\Java\jre-1.8].
2025/5/26 18:18:26 信息 KEPServerEX\IoT Gateway Running with Java 1.8.0_401 [Oracle Corporation Java HotSpot(TM) Client VM version 25.401-b10].
2025/5/26 18:18:41 错误 KEPServerEX\Runtime MQTT agent 'Agent-bak' failed to connect - reason: 'connect timed out'.
2025/5/26 18:21:41 安全性 KEPServerEX\Runtime 配置会话由 Administrator as Default User (R/W) 启动。
2025/5/26 19:36:50 信息 KEPServerEX\Runtime MQTT agent 'Agent-bak' is connected to broker 'tcp://192.168.0.203:1883'
2025/5/26 19:51:48 错误 KEPServerEX\Runtime MQTT agent 'Agent-bak' disconnected - reason 'Software caused connection abort: recv failed'

如何配置Iot GateWay

  • 点击图标【KEPServerEX 6 Administration】 或者【KEPServerEX 6 Configuration】
  • 在右下角,选择小图标,右键【设置(E)……】
  • 选择标签【Iot Gateway】
  • 配置Java Use the JRE at: 【C:\Program Files (x86)\Java\jre-1.8\jre】配置到jre目录,不要到bin目录
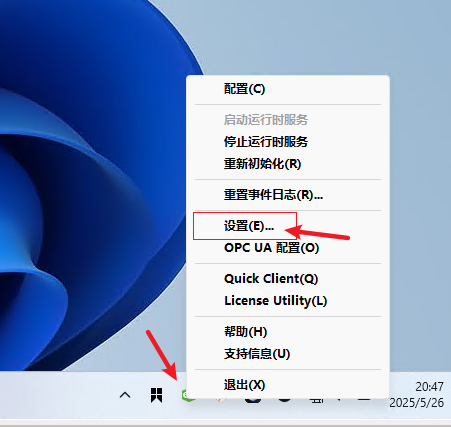
  • 选择【应用】或者【确认】选择即可

示例

配置选项

配置JRE环境

配置Modbus设备采集

确认MQTT 上发是否有效

KepEX6 V6.8时间限制破解

【破解说明】时间限制破解版

1
2
3
4
1、把 KEPServerEX V6.x Crack.exe 放在 C:\Program Files\Kepware\KEPServerEX *\ 文件夹中
2、运行 KEPServerEX V6.x Crack.exe 点击 CRACK 按钮
3、删除 KEPServerEX V6.x Crack.exe
4、重启软件即可
1
2
3
4
1:把 KEPServerEX V5.xV6.x Crack.exe 放在 C:\Program Files (x86)\Kepware\KEPServerEX 6
2:运行 KEPServerEX V5.xV6.x Crack.exe 点击 CRACK 按钮
3:删除 KEPServerEX V5.xV6.x Crack.exe
4:重启.

示例

M250401-MongoDBHA-MongoDB集群-(Replica Set)副本集集群搭建


初始化Init副本集

1
2
3
4
5
6
7
8
rs.initiate({
_id: "rs0",
members: [
{ _id: 0, host: "192.168.0.245:27017" },
{ _id: 1, host: "192.168.0.246:27017" },
{ _id: 2, host: "192.168.0.247:27017", arbiterOnly: true }
]
})

MongoDB-(Replica Set)副本集-集群搭建

副本集概述

  • MongoDB的副本集(Replica Set)是一种提供数据冗余和高可用性的架构。它是由多个维护相同数据集的mongod
    进程(即数据库实例)组成的一个集合,这些实例分布在不同的服务器上。

  • 副本集的设计目标是为了确保在单个服务器发生故障时,数据库服务依然可以继续运作,从而提高了系统的可靠性和容错能力。

副本集的架构

  • 一个副本集最多有50个节点。一个副本集最多有7个投票节点,其余节点必须是没有投票权的节点。
  • 副本集的最小推荐配置是三个节点:
    • 一个主节点和两个从节点。
    • 一个主节点、一个从节点和仲裁节点。

副本集的成员

副本集有两种类型三种角色

  • 两种类型
    • 主节点(Primary)类型:数据操作的主要连接点,可读写
    • 次要(辅助、从)节点(Secondaries)类型:数据冗余备份节点,可以读或选举
  • 三种角色
    • 主要成员(Primary):主要接收所有写操作。就是主节点。
    • 副本成员(Replicate):从主节点通过复制操作以维护相同的数据集,即备份数据,不可写操作,但可以读操作(但需要配置)。是默认的一种从节点类型
    • 仲裁者(Arbiter):不保留任何数据的副本,只具有投票选举作用,当然也可以将仲裁服务器维护为副本集的一部分,即副本成员同时也可以是仲裁者。也是一种从节点类型。
  • 建议
    • 如果你的副本+主节点的个数是偶数,建议加一个仲裁者,形成奇数,容易满足大多数的投票。
    • 如果你的副本+主节点的个数是奇数,可以不加仲裁者。

集群部署

节点划分

一台机器上部署三个mongodb节点

IP地址 端口 角色
192.168.0.245 27017 主节点
192.168.0.246 27018 副本节点
192.168.0.247 27019 仲裁节点

测试脚本

1
2
3
sudo /opt/data/mongodb-27017/bin/mongod -f /opt/data/mongodb-27017/mongod-27017.yaml
sudo /opt/data/mongodb-27018/bin/mongod -f /opt/data/mongodb-27018/mongod-27018.yaml
sudo /opt/data/mongodb-27019/bin/mongod -f /opt/data/mongodb-27019/mongod-27019.yaml

数据库需配置密钥链接

配置 MongoDB 副本集时,启用了认证(authorization),但没有指定密钥文件(keyFile)。在 MongoDB
副本集中,如果启用了认证功能,密钥文件是必需的,用于成员之间的身份验证。

密钥文件必须具有适当的权限,以防止未经授权的访问。

1
2
3
4
5
6
7
8
9
10
openssl rand -base64 756 > /opt/data/mongodb-27017/keyfile

运行以下命令设置权限:
sudo chown mongodb:mongodb /opt/data/mongodb-27017/keyfile
sudo chmod 400 /opt/data/mongodb-27017/keyfile

## mongo.cnf配置密钥
security:
authorization: enabled
keyFile: /opt/data/mongodb-27017/keyfile
1
2
3
4
5
6
7
8
9
10
11
12
13
14
15
16
17
18
19
20
21
22
23
# Where and how to store data.
storage:
dbPath: /var/lib/mongodb
wiredTiger:
engineConfig:
cacheSizeGB: 12
replication:
replSetName: replicaset

# where to write logging data.
systemLog:
destination: file
logAppend: true
path: /var/log/mongodb/mongod.log

security:
authorization: enabled
keyFile: /opt/data/mongodb-27017/keyfile

# network interfaces
net:
port: 27017
bindIp: 0.0.0.0

配置文件

(主节点 mongod-27017.yaml)

vim /opt/data/mongodb-27017/mongod-27017.yaml

1
2
3
4
5
6
7
8
9
10
11
12
13
14
15
16
17
18
19
20
21
22
23
systemLog:
destination: file
path: "/opt/data/mongodb-27017/log/mongod.log"
logAppend: true
storage:
dbPath: "/opt/data/mongodb-27017/data"
journal:
# 启用持久性日志
enabled: true
wiredTiger:
engineConfig:
cacheSizeGB: 12
replication:
replSetName: replicaset
processManagement:
fork: true
pidFilePath: "/opt/data/mongodb-27017/log/mongod.pid"
net:
bindIp: localhost,192.168.0.204
port: 27017
security:
authorization: enabled
keyFile: /opt/data/mongodb-27017/keyfile

System 服务命令

1
2
3
4
5
6
7
8
9
10
11
12
13
14
15
16
17
18
19
20
21
22
23
24
25
26
27
28
29
30
31
32
33
[Unit]
Description=mongodb-27017.service
After=network.target
StartLimitIntervalSec=0

[Service]
ExecStart=/opt/data/mongodb-27017/bin/mongod -f /opt/data/mongodb-27017/mongod-27017.yaml
ExecReload=/bin/kill -s HUP $MAINPID
ExecStop=/opt/data/mongodb-27017/bin/mongod --shutdown -f /opt/data/mongodb-27017/mongod-27017.yaml
User=root
Group=root
PrivateTmp=true
LimitNOFILE=65536
Restart=always
RestartSec=5s
# file size
LimitFSIZE=infinity
# cpu time
LimitCPU=infinity
# virtual memory size
LimitAS=infinity
# open files
# processes/threads
LimitNPROC=64000
# locked memory
LimitMEMLOCK=infinity
# total threads (user+kernel)
TasksMax=infinity
TasksAccounting=false

[Install]
WantedBy=multi-user.target
Alias=mongodb-27017.service

(副本节点 mongod-27018.yaml)

vim /opt/data/mongodb-27018/mongod-27018.yaml

1
2
3
4
5
6
7
8
9
10
11
12
13
14
15
16
17
18
19
20
21
22
23
systemLog:
destination: file
path: "/opt/data/mongodb-27018/log/mongod.log"
logAppend: true
storage:
dbPath: "/opt/data/mongodb-27018/data"
journal:
# 启用持久性日志
enabled: true
wiredTiger:
engineConfig:
cacheSizeGB: 2
processManagement:
fork: true
pidFilePath: "/opt/data/mongodb-27018/log/mongod.pid"
net:
bindIp: localhost,192.168.0.204
port: 27018
replication:
replSetName: replicaset
security:
authorization: enabled
keyFile: /opt/data/mongodb-27017/keyfile

System 服务命令

1
2
3
4
5
6
7
8
9
10
11
12
13
14
15
16
17
18
19
20
21
22
23
24
25
26
27
28
29
30
31
32
33
[Unit]
Description=mongodb-27018.service
After=network.target
StartLimitIntervalSec=0

[Service]
ExecStart=/opt/data/mongodb-27018/bin/mongod -f /opt/data/mongodb-27018/mongod-27018.yaml
ExecReload=/bin/kill -s HUP $MAINPID
ExecStop=/opt/data/mongodb-27018/bin/mongod --shutdown -f /opt/data/mongodb-27018/mongod-27018.yaml
User=root
Group=root
PrivateTmp=true
LimitNOFILE=65536
Restart=always
RestartSec=5s
# file size
LimitFSIZE=infinity
# cpu time
LimitCPU=infinity
# virtual memory size
LimitAS=infinity
# open files
# processes/threads
LimitNPROC=64000
# locked memory
LimitMEMLOCK=infinity
# total threads (user+kernel)
TasksMax=infinity
TasksAccounting=false

[Install]
WantedBy=multi-user.target
Alias=mongodb-27018.service

(仲裁节点 mongod-27019.yaml)

vim /opt/data/mongodb-27019/mongod-27019.yaml

1
2
3
4
5
6
7
8
9
10
11
12
13
14
15
16
17
18
19
20
21
22
23
systemLog:
destination: file
path: "/opt/data/mongodb-27019/log/mongod.log"
logAppend: true
storage:
dbPath: "/opt/data/mongodb-27019/data"
journal:
# 启用持久性日志
enabled: true
wiredTiger:
engineConfig:
cacheSizeGB: 2
processManagement:
fork: true
pidFilePath: "/opt/data/mongodb-27019/log/mongod.pid"
net:
bindIp: localhost,192.168.0.204
port: 27019
replication:
replSetName: replicaset
security:
authorization: enabled
keyFile: /opt/data/mongodb-27017/keyfile

System 服务命令

1
2
3
4
5
6
7
8
9
10
11
12
13
14
15
16
17
18
19
20
21
22
23
24
25
26
27
28
29
30
31
32
33
[Unit]
Description=mongodb-27019.service
After=network.target
StartLimitIntervalSec=0

[Service]
ExecStart=/opt/data/mongodb-27019/bin/mongod -f /opt/data/mongodb-27019/mongod-27019.yaml
ExecReload=/bin/kill -s HUP $MAINPID
ExecStop=/opt/data/mongodb-27019/bin/mongod --shutdown -f /opt/data/mongodb-27019/mongod-27019.yaml
User=root
Group=root
PrivateTmp=true
LimitNOFILE=65536
Restart=always
RestartSec=5s
# file size
LimitFSIZE=infinity
# cpu time
LimitCPU=infinity
# virtual memory size
LimitAS=infinity
# open files
# processes/threads
LimitNPROC=64000
# locked memory
LimitMEMLOCK=infinity
# total threads (user+kernel)
TasksMax=infinity
TasksAccounting=false

[Install]
WantedBy=multi-user.target
Alias=mongodb-27019.service

副本集命令配置

初始化副本集 rs.initiate()

1
2
3
4
5
6
7
8
9
10
11
12
13
14
15
16
17
rs.initiate({
_id: "rs0",
members: [
{ _id: 0, host: "192.168.0.245:27017" },
{ _id: 1, host: "192.168.0.246:27017" },
{ _id: 2, host: "192.168.0.247:27017", arbiterOnly: true }
]
})

rs.initiate({
_id: "replicaset",
members: [
{ _id: 0, host: "192.168.0.245:27017" },
{ _id: 1, host: "192.168.0.246:27017" },
{ _id: 2, host: "192.168.0.247:27017", arbiterOnly: true }
]
})
1
2
3
4
5
6
7
8
9
10
11
12
13
14
15
16
17
test> show dbs;
MongoServerError[NotPrimaryOrSecondary]: node is not in primary or recovering state

test> rs.initiate()
{
info2: 'no configuration specified. Using a default configuration for the set',
me: '192.168.0.204:27017',
ok: 1,
'$clusterTime': {
clusterTime: Timestamp({ t: 1748312432, i: 1 }),
signature: {
hash: Binary.createFromBase64('AAAAAAAAAAAAAAAAAAAAAAAAAAA=', 0),
keyId: Long('0')
}
},
operationTime: Timestamp({ t: 1748312432, i: 1 })
}

查看副本集的配置内容 rs.config()

1
2
3
4
5
6
7
8
9
10
11
12
13
14
15
16
17
18
19
20
21
22
23
24
25
26
27
28
29
30
31
32
replicaset [direct: primary] test> rs.config()
{
_id: 'replicaset',
version: 1,
term: 1,
members: [
{
_id: 0,
host: '192.168.0.204:27017',
arbiterOnly: false,
buildIndexes: true,
hidden: false,
priority: 1,
tags: {},
secondaryDelaySecs: Long('0'),
votes: 1
}
],
protocolVersion: Long('1'),
writeConcernMajorityJournalDefault: true,
settings: {
chainingAllowed: true,
heartbeatIntervalMillis: 2000,
heartbeatTimeoutSecs: 10,
electionTimeoutMillis: 10000,
catchUpTimeoutMillis: -1,
catchUpTakeoverDelayMillis: 30000,
getLastErrorModes: {},
getLastErrorDefaults: { w: 1, wtimeout: 0 },
replicaSetId: ObjectId('6835216fb987ae743956e082')
}

查看副本集状态 rs.status()

1
2
3
4
5
6
7
8
9
10
11
12
13
14
15
16
17
18
19
20
21
22
23
24
25
26
27
28
29
30
31
32
33
34
35
36
37
38
39
40
41
42
43
44
45
46
47
48
49
50
51
52
53
54
55
56
57
58
59
60
61
62
63
64
65
66
67
68
69
70
71
72
73
74
replicaset [direct: primary] test> rs.status()
{
set: 'replicaset',
date: ISODate('2025-05-27T02:22:02.694Z'),
myState: 1,
term: Long('1'),
syncSourceHost: '',
syncSourceId: -1,
heartbeatIntervalMillis: Long('2000'),
majorityVoteCount: 1,
writeMajorityCount: 1,
votingMembersCount: 1,
writableVotingMembersCount: 1,
optimes: {
lastCommittedOpTime: { ts: Timestamp({ t: 1748312514, i: 1 }), t: Long('1') },
lastCommittedWallTime: ISODate('2025-05-27T02:21:54.468Z'),
readConcernMajorityOpTime: { ts: Timestamp({ t: 1748312514, i: 1 }), t: Long('1') },
appliedOpTime: { ts: Timestamp({ t: 1748312514, i: 1 }), t: Long('1') },
durableOpTime: { ts: Timestamp({ t: 1748312514, i: 1 }), t: Long('1') },
writtenOpTime: { ts: Timestamp({ t: 1748312514, i: 1 }), t: Long('1') },
lastAppliedWallTime: ISODate('2025-05-27T02:21:54.468Z'),
lastDurableWallTime: ISODate('2025-05-27T02:21:54.468Z'),
lastWrittenWallTime: ISODate('2025-05-27T02:21:54.468Z')
},
lastStableRecoveryTimestamp: Timestamp({ t: 1748312484, i: 1 }),
electionCandidateMetrics: {
lastElectionReason: 'electionTimeout',
lastElectionDate: ISODate('2025-05-27T02:20:33.610Z'),
electionTerm: Long('1'),
lastCommittedOpTimeAtElection: { ts: Timestamp({ t: 1748312432, i: 1 }), t: Long('-1') },
lastSeenWrittenOpTimeAtElection: { ts: Timestamp({ t: 1748312432, i: 1 }), t: Long('-1') },
lastSeenOpTimeAtElection: { ts: Timestamp({ t: 1748312432, i: 1 }), t: Long('-1') },
numVotesNeeded: 1,
priorityAtElection: 1,
electionTimeoutMillis: Long('10000'),
newTermStartDate: ISODate('2025-05-27T02:20:34.121Z'),
wMajorityWriteAvailabilityDate: ISODate('2025-05-27T02:20:34.469Z')
},
members: [
{
_id: 0,
name: '192.168.0.204:27017',
health: 1,
state: 1,
stateStr: 'PRIMARY',
uptime: 688,
optime: { ts: Timestamp({ t: 1748312514, i: 1 }), t: Long('1') },
optimeDate: ISODate('2025-05-27T02:21:54.000Z'),
optimeWritten: { ts: Timestamp({ t: 1748312514, i: 1 }), t: Long('1') },
optimeWrittenDate: ISODate('2025-05-27T02:21:54.000Z'),
lastAppliedWallTime: ISODate('2025-05-27T02:21:54.468Z'),
lastDurableWallTime: ISODate('2025-05-27T02:21:54.468Z'),
lastWrittenWallTime: ISODate('2025-05-27T02:21:54.468Z'),
syncSourceHost: '',
syncSourceId: -1,
infoMessage: 'Could not find member to sync from',
electionTime: Timestamp({ t: 1748312433, i: 1 }),
electionDate: ISODate('2025-05-27T02:20:33.000Z'),
configVersion: 1,
configTerm: 1,
self: true,
lastHeartbeatMessage: ''
}
],
ok: 1,
'$clusterTime': {
clusterTime: Timestamp({ t: 1748312514, i: 1 }),
signature: {
hash: Binary.createFromBase64('AAAAAAAAAAAAAAAAAAAAAAAAAAA=', 0),
keyId: Long('0')
}
},
operationTime: Timestamp({ t: 1748312514, i: 1 })
}

添加副本集 rs.add("192.168.0.204:27018")

可以看到是 (not reachable/healthy) ,说明添加的副本节点是有问题的,正常的应该是 SECONDARY ,查看日志

1
rs.add("192.168.0.204:27018")

先将添加的副本节点删除 rs.remove("192.168.0.204:27018")

1
2
rs.remove("192.168.0.204:27018")

配置仲裁节点 rs.addArb("192.168.0.204:27019")

1
rs.addArb("192.168.0.204:27019")

异常信息

1
2
3
4
5
6
7
8
9
10
11
12
13
14
15
16
1. Reconfig attempted to install a config that would change the implicit default write concern. Use the setDefaultRWConcern command to set a cluster-wide write concern and try the reconfig again.

需要在主节点设置一下,命令如下:

db.adminCommand({
"setDefaultRWConcern" : 1,
"defaultWriteConcern" : {
"w" : 2
}
})

再次添加
rs.addArb("192.168.0.204:27019")

查看状态:
rs.status()

在 MongoDB 中,db.adminCommand 是一个用于执行管理命令的方法,而你提到的命令:

1
2
3
4
5
6
7
8
9
10
11
12
13
db.adminCommand({
"setDefaultRWConcern": 1,
"defaultWriteConcern": {
"w": 2 // 表示写操作需要在主节点和至少一个从节点上成功确认
}
})

db.adminCommand({
"setDefaultRWConcern": 1,
"defaultWriteConcern": {
"w": 1 // 实际可配置成1,保证单节点OK即可
}
})

是用于设置默认的写关注(Write Concern)配置的命令。以下是详细解释:

1. 命令的作用

  • setDefaultRWConcern: 这是一个管理命令,用于设置默认的读写关注(Read/Write Concern)配置。
    • 1 表示启用此功能。
  • defaultWriteConcern: 这是设置默认的写关注配置。
    • w: 2 表示写操作需要在至少两个节点上成功确认后才返回成功。

2. 写关注(Write Concern)

写关注(Write Concern)定义了写操作需要在多少个节点上成功确认后才返回成功。它主要用于控制数据的持久性和一致性。

  • w: 1: 默认值,表示写操作只需在主节点上成功即可。
  • w: 2: 表示写操作需要在主节点和至少一个从节点上成功确认。
  • w: "majority": 表示写操作需要在大多数节点上成功确认。

3. 在 MongoDB 集群中的作用

在 MongoDB 集群(如副本集或分片集群)中,写关注配置非常重要,因为它直接影响数据的持久性和性能:

  • 高可用性和一致性:设置较高的写关注(如 w: 2w: "majority")可以确保数据在多个节点上持久化,从而提高数据的可用性和一致性。
  • 性能:较高的写关注会增加写操作的确认时间,从而可能降低写性能。因此,需要根据实际需求权衡。

创建MongoDB数据库密码模式

1
2
3
4
5
6
7
8
9
10
11
12
13
14
15
16
17
18
19
20
21
22
23
24
25
26
27
28
29
30
31
32
33
34
35
36
37
38
39
40
use admin

db.createUser({
user: 'db_reader',
pwd: 'A123456',
mechanisms: ["SCRAM-SHA-1"],
roles: [{
role: "read",
db: "my-app"
}]
});

db.createUser({
user: "db_manager",
pwd: "A456789",
mechanisms: ["SCRAM-SHA-1"],
roles: ['readWriteAnyDatabase', 'dbAdminAnyDatabase', {
role: "dbAdmin",
db: 'my-app'
}, {
role: "readWrite",
db: 'my-app'
}, {
role: "dbAdmin",
db: 'my-app'
}]
});

db.createUser({
user: 'db_root',
pwd: 'A10111213',
mechanisms: ["SCRAM-SHA-1"],
roles: [{
role: "dbAdminAnyDatabase",
db: "admin"
}, {
role: "root",
db: "admin"
}]
});

数据库需配置密钥链接

配置 MongoDB 副本集时,启用了认证(authorization),但没有指定密钥文件(keyFile)。在 MongoDB
副本集中,如果启用了认证功能,密钥文件是必需的,用于成员之间的身份验证。

密钥文件必须具有适当的权限,以防止未经授权的访问。

1
2
3
4
5
6
7
8
9
10
openssl rand -base64 756 > /opt/data/mongodb-27017/keyfile

运行以下命令设置权限:
sudo chown mongodb:mongodb /opt/data/mongodb-27017/keyfile
sudo chmod 400 /opt/data/mongodb-27017/keyfile

## mongo.cnf配置密钥
security:
authorization: enabled
keyFile: /opt/data/mongodb-27017/keyfile

异常信息 keyfile are too open

1
{"t":{"$date":"2025-05-27T03:01:21.276+00:00"},"s":"I",  "c":"ACCESS",   "id":20254,   "ctx":"main","msg":"Read security file failed","attr":{"error":{"code":30,"codeName":"InvalidPath","errmsg":"permissions on /opt/data/mongodb-27017/keyfile are too open"}}}

这个错误信息表明 MongoDB 无法启动,因为密钥文件 /opt/data/mongodb-27017/keyfile 的权限设置不正确。MongoDB
要求密钥文件的权限必须严格限制,以确保只有 MongoDB 进程可以访问它。

错误解释

  • **Read security file failed**:MongoDB 无法读取密钥文件。
  • **permissions on /opt/data/mongodb-27017/keyfile are too open**:密钥文件的权限设置过于宽松,MongoDB 不允许这种情况。

解决方法

你需要确保密钥文件的权限正确设置,具体步骤如下:

1. 检查密钥文件的当前权限

运行以下命令查看密钥文件的当前权限:

1
ls -l /opt/data/mongodb-27017/keyfile

你可能会看到类似以下的输出:

1
-rw-r--r-- 1 mongodb mongodb 756 May 27 03:00 /opt/data/mongodb-27017/keyfile

这表示当前权限是 644(所有者可读写,组可读,其他用户也可读)。

2. 设置正确的权限

MongoDB 要求密钥文件的权限必须是 600(只有所有者可以读写,其他用户无权限)。运行以下命令设置正确的权限:

sudo chmod 600 /opt/data/mongodb-27017/keyfile

. 验证权限

再次运行 ls -l 命令,确保权限已正确设置:

SpringBoot 配置数据库连接(副本集模式)

无密码模式

1
spring.data.mongodb.uri=mongodb://192.168.0.204:27017,192.168.0.204:27018,192.168.0.204:27019/my-app?replicaSet=replicaset

有密码模式

1
spring.data.mongodb.uri=mongodb://db_manager:db_manager@192.168.0.204:27017,192.168.0.204:27018,192.168.0.204:27019/my-app?replicaSet=replicaset&authSource=admin

正常状态的 rs.status()

name: ‘192.168.0.204:27017’ stateStr: ‘PRIMARY’

name: ‘192.168.0.204:27018’ stateStr: ‘SECONDARY’

name: ‘192.168.0.204:27019’ stateStr: ‘ARBITER’

主节点的选举原则

1、主节点选举触发条件

  • MongoDB在副本集中,会自动进行主节点的选举,主节点选举的触发条件
    • 主节点故障
    • 主节点网络不可达(默认心跳信息为10秒)
    • 人工干预(rs.stepDown(600))primary直接降级在600s内不会把自己选为primary
  • 一旦触发选举,就要根据一定规则来选择主节点。

2、选举规则

  • 选举规则是根据票数来决定谁获胜
    • 票数最高,且获得了“大多数”成员的投票支持的节点获胜。
    • “大多数”的定义为:假设复制集内投票成员时N,则大多数为N/2+1。例如:3个投票成员,则大多数的值是2。当复制集内存活成员数量不足大多数时,整个复制集将无法选举primary,复制集将无法提供写服务,处于只读状态。
    • 若票数相同,且都获得了“大多数”成员的投票支持的,数据新的节点获胜。
    • 数据的新旧是通过操作日志oplog来对比的。
  • 在获得票数的时候,优先级(priority)参数影响重大。

可以通过设置优先级(priority)来设置额外票数。优先级即权重,取值为0-1000,相当于增加0-1000的票数,优先级的值越大,就越可能获得多数成员的投票(votes)数。指定较高的值可使成员更有资格成员主要成员,更低的值可使成员更不符合条件。

  • 默认情况下,优先级的值是1

主节点的选举原则

MongoDB在副本集中,会自动进行主节点的选举,主节点选举的触发条件:

  • 1.主节点故障
  • 2.主节点网络不可达(默认心跳信息为10秒)
  • 3.人工干预(rs.stepDown(600))

一旦触发选举,就要根据一定规则来选主节点。

选举规则是根据票数来决定谁获胜:

  • 票数最高,且获得了“大多数”成员的投票支持的节点获胜。
    “大多数”的定义为:假设复制集内投票成员数量为N,则大多数为 N/2 +
    1。例如:3个投票成员,则大多数的值是2。当复制集内存活成员数量不足大多数时,整个复制集将无法选举出Primary,复制集将无法提供写服务,处于只读状态。

  • 若票数相同,且都获得了“大多数”成员的投票支持的,数据新的节点获胜。数据的新旧是通过操作日志oplog来对比的。

在获得票数的时候,优先级(priority)参数影响重大。可以通过设置优先级(priority)来设置额外票数。优先级即权重,取值为0-1000,相当于可额外增加0-1000的票数,优先级的值越大,就越可能获得多数成员的投票(votes)数。指定较高的值可使成员更有资格成为主要成员,更低的值可使成员更不符合条件。默认情况下,优先级的值是1

可以看出,主节点和副本节点的优先级各为1,即,默认可以认为都已经有了一票。但选举节点,优先
级是0,(选举节点的优先级必须是0,不能是别的值。即不具备选举权,但具有投票权)

故障测试

1. 副本节点故障测试

提升主节点的优先级

关闭27018副本节点,主节点和仲裁节点对27018的心跳失败。因为主节点还在,因此,没有触发投票选举。

在主节点写入数据

db.comment.insert({})

再启动从节点,会发现,主节点写入的数据,会自动同步给从节点。

如果此时,在主节点写入数据。

2. 主节点故障测试

关闭27017节点后发现,从节点和仲裁节点对27017的心跳失败,当失败超过10秒,此时因为没有主节点了,会自动发起投票。

而副本节点只有27018,因此,候选人只有一个就是27018,开始投票。27019向27018投了一票,27018本身自带一票,因此共两票,超过了“大多数”27019是仲裁节点,没有选举权,27018不向其投票,其票数是0.最终结果,27018成为主节点。具备读写功能。在27018写入数据查看。

db.comment.insert({})

再启动27017节点,发现27017变成了从节点,27018仍保持主节点。登录27017节点,发现是从节点了,数据自动从27018同步。从而实现了高可用。

3. 仲裁节点和主节点故障测试

先关掉仲裁节点27019,关掉现在的主节点27017。

登录27018节点后发现,27018仍然是从节点,副本集中没有主节点了,导致此时副本集是只读状态,无法写入。

为啥不选举了?因为27018的票数,没有获得大多数,即没有大于等于2,它只有默认的一票(优先级是1)如果要触发选举,随便加入一个成员即可。

  • 如果只加入27019仲裁节点成员,则主节点一定是27018,因为没得选了,仲裁节点不参与选举,但参与投票。
  • 如果只加入27017节点,会发起选举。因为27017和27018都是两票,则按照谁数据新,谁当主节点。

4. 仲裁节点和从节点故障测试

先关掉仲裁节点27019,关掉现在的副本节点27018。10秒后,27017主节点自动降级为副本节点。(服务降级)副本集不可写数据了,已经故障了。

集群故障分析

序号 故障类型 是否影响使用
1 主节点故障 不影响正常使用
2 副本节点故障 不影响正常使用
3 仲裁节点故障 不影响正常使用
4 主节点和仲裁节点故障 影响正常使用,需要处理
5 从节点和仲裁节点故障 影响正常使用,需要处理
6 主节点和从节点故障 影响正常使用,需要处理
7 所有节点故障 影响正常使用,需要处理

1、主节点故障

  • 从节点和仲裁节点对主节点的心跳失败,当失败超过10秒,此时因为没有主节点了,会自动发起投票。
    • 而副本节点只有一台,因此,候选人只有一个就是副本节点,开始投票。
    • 仲裁节点向副本节点投了一票,副本节点本身自带一票,因此共两票,超过了”大多数”。
    • 27019是仲裁节点,没有选举权,27018不向其投票,其票数是0。
    • 最终结果,27018成为主节点。具备读写功能。
  • 再启动 27017主节点,发现27017变成了从节点,27018仍保持主节点。
  • 登录27017节点,发现是从节点了,数据自动从27018同步。
  • 此时:不影响正常使用

2、副本节点故障

  • 主节点和仲裁节点对副本节点的心跳失败。因为主节点还在,因此,没有触发投票选举。
    如果此时,在主节点写入数据。再启动从节点,会发现,主节点写入的数据,会自动同步给从节点。
  • 此时:不影响正常使用

3、仲裁节点故障

  • 主节点和副本节点对仲裁节点的心跳失败。因为主节点还在,因此,没有触发投票选举。
  • 此时:不影响正常使用

4、主节点和仲裁节点故障

副本集中没有主节点了,导致此时,副本集是只读状态,无法写入。

因为27017的票数,没有获得大多数,即没有大于等于2,它只有默认的一票(优先级是1)
如果要触发选举,随便加入一个成员即可。

  • 如果只加入 27019仲裁节点成员,则主节点一定是27017,因为没得选了,仲裁节点不参与选举,但参与投票。
  • 如果只加入 27018节点,会发起选举。因为27017和27018都是两票,则按照谁数据新,谁当主节点。

此时:影响正常使用,需要处理

5、从节点和仲裁节点故障

10秒后,27017主节点自动降级为副本节点。(服务降级)
副本集不可写数据了,已经故障了。

此时:影响正常使用,需要处理

6、主节点和从节点故障

集群将处于不完全状态,无法执行写操作,因为剩余的副本节点不足以立即选出新的主节点(假设只剩一个副本节点和仲裁节点)。直到至少有一个额外的副本节点在线并同步,以便选举出新的主节点

此时:影响正常使用,需要处理

7、所有节点故障

  • 整个集群不可用,既不能执行读也不能执行写操作。
  • 这种情况需要手动干预,逐一排查并恢复各个节点,确保至少一个主节点和多数节点(包括仲裁节点)在线,以恢复集群服务。
  • 此时:影响正常使用,需要处理

Windows 下载汇总(Windows/Windows Server2008)等

Windows 下载汇总

https://sysin.org/blog/windows/

Windows Server(2008/2016/2019/2022/2025)

下载地址(Windows7/Windows Server2008)

Windows 7 Ultimate with SP1 x64 简体中文旗舰版 (2025 年 4 月更新),含补丁包
百度网盘链接:https://pan.baidu.com/s/1PjgDBMgK86uJqj23Vk5l_A?pwd=3oev

Windows Server 2008 R2 Datacenter SP1 x64 简体中文版 (2025 年 4 月更新),含补丁包
百度网盘链接:https://pan.baidu.com/s/1FdUE8bxugWz2sC7gHKoS3w?pwd=3fq6

MongoDB平台支持安装的操作系统版本

MongoDB Plat操作系统支持安装的版本

https://www.mongodb.com/zh-cn/docs/manual/administration/production-notes/#std-label-prod-notes-supported-platforms

平台支持

在生产环境中
运行,请参阅推荐的平台
以获取操作系统建议。

平台支持说明

x86_64

MongoDB 需要满足以下最低配置要求的 x86_64 微架构:

  • 对于 Intel x86_64,MongoDB 需要:
    • Sandy Bridge 或更高版本的酷睿处理器,再或
    • Tiger Lake 或更高版本的赛扬或奔腾处理器。
  • 对于 AMD x86_64,MongoDB 需要:
    • Bulldozer 或更高版本的处理器。

从 MongoDB 5.0 开始,
mongod

mongos
和旧版
mongo
Shell 不再支持不符合此最低微架构要求的
x86_64 平台。

  • MongoDB 仅支持运行 Red Hat Compatible Kernel (RHCK) 的 Oracle Linux。MongoDB 支持 Unbreakable Enterprise Kernel (
    UEK)。
  • MongoDB 5.0 需要使用 AVX
    指令集,该指令集在部分 Intel 和 AMD 处理器
    上可用。

arm64

arm64 上的 MongoDB 需要ARMv8.2-A或后来的微架构。

从 MongoDB 5.0 开始,
mongod

mongos
和旧版
mongo
Shell 不再支持不符合此最低微架构要求的
arm64 平台。

要使用 ARM v8.4-A 或更高版本的微架构,请使用 MongoDB 版本 7.0 或更高版本。

平台支持矩阵

从 MongoDB 8.0 开始,新的 MongoDB Server 版本(主要版本和次要版本)支持操作系统(OS)供应商定义的最低操作系统次要版本。当操作系统供应商不再支持某个操作系统次要版本之后,MongoDB
会更新 MongoDB
Server,以支持下一个操作系统次要版本。有关详细信息,请参阅 MongoDB 平台支持改进

MongoDB 8.0 支持以下最低操作系统次要版本:

  • Red Hat Enterprise Linux 8.8
  • Red Hat Enterprise Linux 9.3
  • SUSE Linux Enterprise Server 15 SP5
  • Amazon Linux 2023 版本 2023.3
平台 架构 版本 8.0 7.0 6.0 5.0
Amazon Linux 2023 x86_64 Enterprise
Amazon Linux 2023 x86_64 Community
Amazon Linux V2 x86_64 Enterprise
Amazon Linux V2 x86_64 Community
Debian 12 x86_64 Enterprise
Debian 12 x86_64 Community
Debian 11 x86_64 Enterprise 5.0.8+
Debian 11 x86_64 Community 5.0.8+
Debian 10 x86_64 Enterprise
Debian 10 x86_64 Community
Debian 9 x86_64 Enterprise
Debian 9 x86_64 Community
RHEL/Rocky/Alma/Oracle Linux 9.0+ [1] x86_64 Enterprise 6.0.4+
RHEL/Rocky/Alma/Oracle Linux 9.0+ [1] x86_64 Community 6.0.4+
RHEL/Rocky/Alma/Oracle Linux 8.0+ [1] x86_64 Enterprise
RHEL/Rocky/Alma/Oracle Linux 8.0+ [1] x86_64 Community
RHEL/ Oracle Linux 7.0+ [1] x86_64 Enterprise
RHEL/ Oracle Linux 7.0+ [1] x86_64 Community
SLES 15 x86_64 Enterprise
SLES 15 x86_64 Community
SLES 12 x86_64 Enterprise
SLES 12 x86_64 Community
Ubuntu 24.04 x86_64 Enterprise
Ubuntu 24.04 x86_64 Community
Ubuntu 22.04 x86_64 Enterprise 6.0.4+
Ubuntu 22.04 x86_64 Community 6.0.4+
Ubuntu 20.04 x86_64 Enterprise
Ubuntu 20.04 x86_64 Community
Ubuntu 18.04 x86_64 Enterprise
Ubuntu 18.04 x86_64 Community
Windows 11 x86_64 Enterprise
Windows 11 x86_64 Community
Windows Server 2022 x86_64 Enterprise
Windows Server 2022 x86_64 Community
Windows Server 2019 x86_64 Enterprise
Windows Server 2019 x86_64 Community
Windows 10 / Server 2016 x86_64 Enterprise
Windows 10 / Server 2016 x86_64 Community
macOS 14 x86_64 Enterprise
macOS 14 x86_64 Community
macOS 13 x86_64 Enterprise
macOS 13 x86_64 Community
macOS 12 x86_64 Enterprise
macOS 12 x86_64 Community
macOS 11 x86_64 Enterprise
macOS 11 x86_64 Community
macOS 10.15 x86_64 Enterprise
macOS 10.15 x86_64 Community
macOS 10.14 x86_64 Enterprise
macOS 10.14 x86_64 Community
macOS 14 arm64 Enterprise
macOS 14 arm64 Community
macOS 13 arm64 Enterprise
macOS 13 arm64 Community
macOS 12 arm64 Enterprise
macOS 12 arm64 Community
macOS 11 arm64 Enterprise
macOS 11 arm64 Community
Amazon Linux 2023 arm64 Enterprise
Amazon Linux 2023 arm64 Community
Amazon Linux 2 arm64 Enterprise
Amazon Linux 2 arm64 Community
RHEL/CentOS/Rocky/Alma 9 arm64 Enterprise
RHEL/CentOS/Rocky/Alma 9 arm64 Community
RHEL/CentOS/Rocky/Alma 8 arm64 Enterprise
RHEL/CentOS/Rocky/Alma 8 arm64 Community
Ubuntu 24.04 arm64 Enterprise
Ubuntu 24.04 arm64 Community
Ubuntu 22.04 arm64 Enterprise 6.0.4+
Ubuntu 22.04 arm64 Community 6.0.4+
Ubuntu 20.04 arm64 Enterprise
Ubuntu 20.04 arm64 Community
Ubuntu 18.04 arm64 Enterprise
Ubuntu 18.04 arm64 Community
RHEL/Rocky/Alma 8 [ 5 ] ppc64le Enterprise
RHEL/CentOS 7 ppc64le Enterprise 6.0.7+
RHEL/Rocky/Alma 9 s390x Enterprise
RHEL/Rocky/Alma 8 [ 5 ] s390x Enterprise 5.0.9+
RHEL/CentOS 7 s390x Enterprise
RHEL/CentOS 7 s390x Community
[1] (1, 2, 3, 4, 5, 6) 在 Oracle Linux 上,MongoDB 仅支持 Red Hat Compatible Kernel。
[2] MongoDB 版本 5.0 及更高版本针对 SLES 12 Service Pack 5 进行了测试。MongoDB 的早期版本针对不带服务包的 SLES 12 进行了测试。
[3] MongoDB 版本 7.0 及更高版本针对 SLES 12 Service Pack 4 进行测试。早期版本的 MongoDB 针对不带服务包的 SLES 12 进行测试。
[4] MongoDB 版本 7.0 针对 RHEL 7.9 进行构建和测试。早期版本的 MongoDB 针对 RHEL 7 进行测试,并假定支持向前兼容。
[5] *(12)*PPC64LE 和 s390x 上的 RHEL 8 不支持 MongoDB 8.0 及更高版本中使用的 TCMalloc 更新版。在这些架构上,RHEL 8 使用旧版的 TCMalloc。要了解更多信息,请参阅用于自管理部署的 TCMalloc 性能优化
[6] PPC 64LE 上的 RHEL 9 不支持 MongoDB 8.0 及更高版本中使用的 TCMalloc 的更新版本。在此架构上,RHEL 9使用旧版 TCMalloc 版本。要了解更多信息,请参阅用于自管理部署的 TCMalloc 性能优化。

推荐平台

虽然 MongoDB 支持多种平台,但在 x86_64 架构的生产环境中建议使用以下操作系统:

  • Amazon Linux
  • Debian
  • RHEL [ 7 ]
  • SLES
  • Ubuntu LTS
  • Windows Server

为获得最佳效果,请运行平台的最新版本。如果运行的是旧版本,请确保其提供程序支持您的版本。